
Mega Deck Coming in Clutch
, by Austin Ellis, 39 min reading time
, by Austin Ellis, 39 min reading time
This comprehensive 5000 word article goes over the new Mega Kangaskhan/ Absol deck that surprised players at the 2025 Milwaukee Regional Championships. We go over matchups and game plans for this decision-heavy deck.
Mega Absol ex/Mega Kangaskhan ex
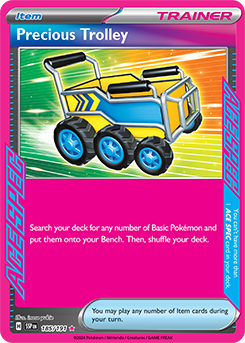
One of the most surprising decks to do well at the Milwaukee Regional Championships was the deck created by Tord Reklev featuring Mega Absol ex and Mega Kangaskhan ex! Mired in controversy before the tournament began, this deck was leaked on X (formerly Twitter) and was immediately met with strong criticism about the morality of leaking decklists from top players before a tournament. We’re not here to discuss this specifically, but despite this, Tord managed to make top 8 at this Regional Championship along with two other players on this deck. Since the initial list was leaked on X, the list went through several optimizations such as replacing the ACE SPEC, Unfair Stamp, with Precious Trolley. Allowing for smoother setups and a perfect board as soon as possible, Precious Trolley has faired better for consistency and deck space reasons over Unfair Stamp. It allows you to play less Ball-search cards in favour of more techs. Gabriel Fernandez piloted a version of this deck using Unfair Stamp to top 8 the Belo Horizonte Regional Championship. While this list has its strengths, the smoother setup of Precious Trolley allows for less stressful attempts at setting up an ideal board.
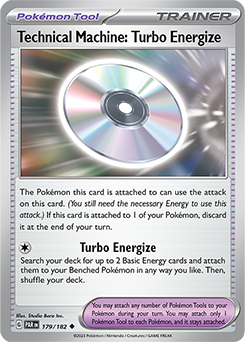
For this article, we will be taking a look at Hale Obernolte’s top 4 list from the Milwaukee Regional Championship, comparing it to Tord’s top 8 list, and discussing some general gameplans with the matchups it can face. One thing to keep in mind with this deck is that it has some of the most non-linear game plans of any deck I’ve ever played. It really emphasizes a skill level that you must make play patterns based on the cards you’ve drawn more so than cards you could draw or want to setup. Some games you may favour having Mega Absol ex setup; however you may need to forgo Mega Absol for certain reasons, and setup Mega Kangaskhan ex instead. It’s also important to keep in mind that this deck has no true Energy acceleration, except for Technical Machine: Turbo Energize, so the placement of each attachment is crucial. I say there is no true Energy acceleration because you will probably only have one turn to be able to use the TM, and if you miss the opportunity, you likely won’t find another good turn to use it. Thankfully, Energy Switch can let you place Energy in suboptimal spots or even get the use of two Munkidori with only one attachment.
Hale Obernolte’s Milwaukee Regional Championships Top 4 List
|
Pokémon (16): 2 Cornerstone Mask Ogerpon ex TWM 112 2 Mega Absol ex MEG 086 2 Mega Kangaskhan ex MEG 104 1 Bloodmoon Ursaluna ex TWM 141 1 Fezandipiti ex SFA 038 1 Latias ex SSP 076 1 Pecharunt ex SFA 039 2 Munkidori TWM 095 2 Yveltal MEG 088 1 Budew PRE 004 1 Psyduck MEP 007 |
Trainers (35): 4 Arven 4 Boss’s Orders 4 Lillie’s Determination 4 Penny 2 Iono 2 Counter Catcher 2 Earthen Vessel 2 Nest Ball 2 Night Stretcher 1 Energy Switch 1 Pokégear 3.0 1 Precious Trolley ACE SPEC 2 Bravery Charm 1 Counter Gain 1 Technical Machine: Turbo Energize 2 Lively Stadium |
Energy (9): 6 Darkness Energy 2 Mist Energy 1 Fighting Energy |
Tord Reklev’s Milwaukee Regional Championships Top 8 List
|
Pokémon (17): 2 Cornerstone Mask Ogerpon ex TWM 112 2 Mega Absol ex MEG 086 2 Mega Kangaskhan ex MEG 104 1 Bloodmoon Ursaluna ex TWM 141 1 Fezandipiti ex SFA 038 1 Latias ex SSP 076 1 Pecharunt ex SFA 039 3 Munkidori TWM 095 2 Yveltal MEG 088 1 Psyduck MEP 007 1 Tatsugiri TWM 131 |
Trainers (34): 4 Arven 3 Boss’s Orders 3 Lillie’s Determination 3 Penny 2 Iono 3 Pokégear 3.0 2 Counter Catcher 2 Earthen Vessel 2 Nest Ball 2 Night Stretcher 1 Energy Switch 1 Precious Trolley ACE SPEC 2 Bravery Charm 2 Technical Machine: Turbo Energize 2 Lively Stadium |
Energy (9): 6 Darkness Energy 2 Mist Energy 1 Fighting Energy |
Let’s talk about the lists and what I personally like about each one. Afterwards, I will give my opinion on what I think the optimal list looks like moving forward. I think the best list is somewhere in the middle of these two; they both have very similar ideas and gameplans. First off, the Energy count seems to be across-the-board set in stone with most lists. Basically, every single list has decided 6 Darkness, 2 Mist, and 1 Fighting Energy is enough.
You may think: “What happens if I prize the Fighting Energy versus the matchups I want it the most?” My answer to that question is that you’ve already answered it. You “want” the Energy in the matchup; you do not “need” the card in the matchup. Sure, it can speed up the process for you to attack with Cornerstone Mask Ogerpon into decks like Gholdengo ex, N’s Zoroark ex, etc., but the truth is, most of the common answers these decks played at Milwaukee could not one-shot the Ogerpon, so you can simply sit back, set up your Munkidori on the Bench and move the damage off as it comes onto the Ogerpon. With numerous Penny in these lists, once the Ogerpon is close to being Knocked Out, you can simply Penny the Pokémon back to your hand and continue walling these decks. When deckbuilding for tournaments at the highest level of competition, you must consider if the space the card you’re looking to include pulls its weight in most matchups or if it swings a matchup so heavily in your favour that it’s worth including and potentially dead drawing later. With a list as tight as these decks tend to have, the second Fighting doesn’t actually accomplish much and if your hand is dead and you *really* need a draw Supporter, you won’t want to draw the second Fighting Energy. Six Darkness Energy is much better to improve the consistency of setting up Mega Absol ex and your Munkidori.

Next, let’s talk about the Pokémon counts. The Pokémon counts in these lists are pretty much similar. The major change between Hale and Tord’s lists is the inclusion of a third Munkidori and Tord opted for a Tatsugiri instead of the Budew. My initial opinion was that Tord’s list is the better of the two (he was the creator of the deck, after all!). Assuming this bias is correct, I decided to play Hale’s list extensively to see if the initial favour I had for Tord’s list was correct. For the Pokémon counts, I appreciate the consistency that Tatsugiri offers while also being less susceptible to being Knocked Out early. Whereas Budew has a lot of synergy in being able to stall the game out for a few turns while you setup your board. However, the Tatsugiri helping with the general consistency of getting set up makes a little more sense than trying to prevent your opponent from setting up. Your Pokémon gets Knocked Out? Oh, have a free look for a Supporter card to smooth the game out. I ended up not using Budew most of the time, and the times I did use it, it was 50/50 on whether or not I was actually able to use it effectively or if it was would just get picked off by an opposing Munkidori, which are very popular in the meta currently. The other glaring issue with Hale’s list was that it only played two Munkidori. Three Munkidori just always feels better, and when you Prize one of your two, it can greatly impact your game. Your board will be so much worse than if you just included the third copy from the get-go. Overall, I believe Tord’s Pokémon lineup is much better for the deck moving forward. Three Munkidori, Tatsugiri for extra Supporter search- Tord clearly put a lot of time and effort into curating the perfect Pokémon lineup.

To make space in the list, I ended up cutting one of the Cornerstone Mask Ogerpon ex. In the matchups I’ve found since this tournament has taken place, I found that most decks this card is used to counter have found techs to overrun them, so the efficacy of Ogerpon has dropped drastically. I will cover more of this later in the article.
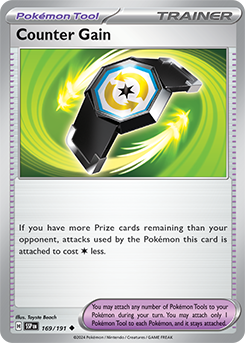
Moving onto the Trainers, this is where I think both players had a good idea of what they wanted to accomplish with the list going into the tournament. The one thing I disliked about Hale’s list was the inclusion of only one Technical Machine: Turbo Energize. This card is crucial to setting your board up quickly and efficiently. Prizing this card can devastate the rest of your game from as early as turn one. I truly believe this deck *needs* to play two copies of this card to have a consistent setup. I did, however, enjoy Hale’s inclusion of Counter Gain! This card is, in my opinion, one of the most underrated cards in the current metagame. The problem with Counter Gain for most other decks is the problem I stated earlier: it’s usually a “want” card, not a “need” card. However, for this deck, I believe this card is solidly a “need” card. Being able to swing out of nowhere with Terminal Period from Mega Absol ex to take a game winning knockout has proven to be a consistent and viable strategy to close out games. As well, Counter Gain can reduce Bloodmoon Ursaluna ex’s Blood Moon attack cost by one more Energy and allows you to effectively have two Energy attachments in a single turn, especially with a deck that values its attachments to Munkidori very highly.
This deck would like to see Boss’s Orders and Penny more often than not, so there are two theories at play here with these two lists. Hale’s list opts for the full four Boss’s Orders and four Penny. These cards are essential to the strategy of this deck. Tord’s list opts to cut one of each of these in favour of two copies of Pokégear 3.0. Essentially what Tord’s list does is it accounts for the Pokégear to act as sort of a “rainbow” Supporter. It could be any other Supporter in the deck! Of course, the Pokégear can whiff, but this is a calculated risk that a lot of top players will accept, since the odds of it failing are pretty low. Understanding this difference in theory, I actually disagree with the increased counts of Pokégear in this deck specifically. This deck thrives on drawing tons of cards turn-over-turn with Mega Kangaskhan ex’s Run Errands Ability. Since you see so many cards, you don’t really need the Pokégear to increase your consistency, and the deck has enough access to supporters, especially with the addition of Tatsugiri. I think the optimal way to play the list now would be to cut two of the Pokégear from Tord’s list, replace one with the fourth copy of Penny, and the other with a copy of Counter Gain. This takes ideas from both lists and gives an effective list for future tournaments.
One of the most key Item cards in the list is Energy Switch and I firmly believe that playing less than two is a big mistake. It obviously worked for this tournament, where the deck was a surprise hit. Moving forward, though, the second Energy Switch is going to come up more and more as people have more targeted gameplans against this deck.
With all these changes in mind, this is the list card-for-card that I’m currently playing:
|
Pokémon (15): 2 Mega Absol ex MEG 086 2 Mega Kangaskhan ex MEG 104 1 Bloodmoon Ursaluna ex TWM 141 1 Cornerstone Mask Ogerpon ex TWM 112 1 Fezandipiti ex SFA 038 1 Latias ex SSP 076 1 Pecharunt ex SFA 039 3 Munkidori TWM 095 2 Yveltal MEG 088 1 Tatsugiri TWM 131 |
Trainers (36): 4 Arven 4 Lillie’s Determination 4 Penny 3 Boss’s Orders 2 Iono 2 Counter Catcher 2 Earthen Vessel 2 Energy Switch 2 Nest Ball 2 Night Stretcher 1 Pokégear 3.0 1 Precious Trolley ACE SPEC 2 Bravery Charm 2 Technical Machine: Turbo Energize 1 Counter Gain 2 Lively Stadium |
Energy (9): 6 Darkness 2 Mist 1 Fighting |
MATCHUPS & SETUP:
One of my main issues about this deck is that writing about how to play certain matchups is much easier said than done. This deck is incredibly nonlinear, and you must play your hand as it is based on what you Prized or how they’re setup. If you draw into no Precious Trolley, you may try to stall with Yveltal until you can get going. Sometimes, you’ll have to put together a mishmash of Munkidori, attacking with Fezandipiti because your setup isn’t ideal, or something else altogether.
In most matchups, you’re going to want to go second. It is tantamount to the deck’s strategy to find the turn one Precious Trolley, set up the perfect board into the matchup you’re playing, and try to get a TM: Turbo Energize used. I’ve often found with this deck, however, that you will usually have to just work with whatever you’ve drawn, even if it isn’t your ideal game plan. Get as many reps in as possible with this deck, as you will need to see the various lines you can take especially when you do not get your ideal turn one setup.
Depending on what you start, your board state after using Precious Trolley should have a combination of following Pokémon: Munkidori, Yveltal, Pecharunt ex, Latias ex, Mega Kangaskhan ex, and/or Mega Absol ex. If you’ve prized any of your one-of Pokémon such as Latias or Pecharunt, leave this Bench space open in case you need a Fezandipiti or other tech Pokémon such as Psyduck if you opt to play it.
For my current list, I’ve opted to cut Psyduck, as it is simply a brick often enough where it does not warrant being played. A decent portion of Dusknoir decks now play Klefki to counter Psyduck and every time I have started it, it has been a dead card. Certainly, you can use a Penny to pick it up so it’s never “stuck” in play, but having to dedicate a turn off to picking it up is not ideal. For consistency and simplicity’s sake, we’ve cut it for now.

If you decide to play Psyduck and you’re playing against a deck that uses Dusknoir, I will hesitate to play down the Psyduck until they show the Duskull to put pressure on. In games 2 and 3 after they’ve shown it in their list, play it down as soon as you can so you always have access to it and don’t get punished because you can’t find it later in the game. Keep in mind that Charizard ex decks specifically will be playing the combination of Jet Energy+Klefki to be able to use Dusknoir even with Psyduck in play. Dragapult decks are also beginning to use Klefki, though this is less common. What Dragapult can do, however, is use Hawlucha’s Flying Entry Ability to put a damage counter on the Psyduck and use the six damage counters from Phantom Dive to Knock Out the Psyduck. You counteract this by putting a Mist Energy on the Psyduck, but I still find it to be a somewhat dead card in other matchups, so I’ve decided to forgo it in this current iteration. This is simply going to be a metagame tech choice for tournaments in the future and is neither right nor wrong to exclude from the list.
I’ve recently found Gholdengo ex and N’s Zoroark ex to be quite challenging matchups lately. As stated before, the Cornerstone Mask Ogerpon ex is going to be the name of the game in these matchups. With the inability for Gholdengo or N’s Zoroark to touch the Cornerstone, the matchup was what most people would consider free. However, due to the prevalence of Cornerstone in the current metagame, these decks have adapted by including more solid answers to this pesky tech card.
N's Zoroark ex
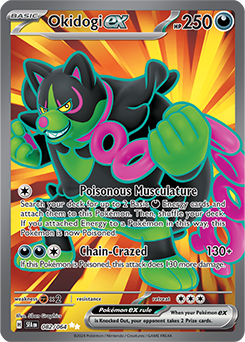
Some N’s Zoroark decks have begun including a copy of Okidogi ex! This card is a crazy good counter to Ogerpon and swings the matchup into N’s Zoroark’s favour immensely, hitting 260 damage if the Okidogi ex is Poisoned. The pressure applied from this one tech in N’s Zoroark decks can outpace any Cornerstone Ogerpon stalling strategy. Given this possibility, it is still recommended to at least put the Cornerstone in the Active to force your opponent to answer it. This also challenges the opponent to see if they even play it. If they don’t play it, or if it’s Prized, the matchup is going to swing back in your favour. If it is in your opponent’s list, you will have an uphill battle ahead. In these cases, I would not recommend setting up any of your Mega Pokémon ex entirely. If they show you the Okidogi ex, send Cornerstone in the Active to be sacrificed. Then promote a Mega Pokémon ex (ideally Mega Kangaskhan) in the Active so it can tank a hit, you’ll need to set up a Darkness Energy on two Munkidori on the Bench with TM: Turbo Energize and ensure you maintain two Munkidori in play during this time. Then, you will get 60 damage on the Okidogi ex by using of the Adrena Brain, allowing you to set up a Knock Out with Terminal Period through Mega Absol ex with attachment for turn plus the Counter Gain! This will be one of the only effective ways to deal with Okidogi ex. You’ll then attempt to pivot back into a Cornerstone if they cannot get back into Okidogi ex, otherwise, swing with Mega Absol ex and start stripping their hand.
It’s pertinent that you do NOT attack into the Zoroark unless you can guarantee the Zoroark will be Knocked Out. Doing so and not removing it will allow them to copy N’s Reshiram’s attack for 20 damage for each damage counter on the Zoroark. This is only acceptable if you have only a Cornerstone in the Active and attacking. Getting back on track, once you take the Knock Out on the Okidogi ex, you’ll then try to use Mega Absol to use Terminal Period again. This will bring you to two Prizes, and from here you can get away with using Munkidori and a Bloodmoon Ursaluna ex to clean up these last two Prizes. Navigating these board states perfectly has proven challenging but not impossible.
Gholdengo ex
Most Gholdengo decks currently play no Energy Search Pro and have instead opted to focus on drawing more cards with Solrock/Lunatone and being able to pivot to them as one-Prize attackers. To assist with countering Cornerstones, some lists have started to opt to play Mega Lucario ex as a big Pokémon that can one-shot a Cornerstone. This Pokémon serves the same purpose as Okidogi in the Zoroark decks and is also just as effective. If the Gholdengo decks play the Mega Lucario, it will prove to be quite the challenge. In the Gholdengo matchup, it is pertinent to still send up the Cornerstone and attempt to set it up. This is where you may want to try to pivot into an Yveltal stalling strategy! If they play the Mega Lucario, what you’re going to want to do is setup Cornerstone Mask Ogepron and two Yveltal, getting an Energy on both birds. Get Energy on your Munkidori to use their Adrena-Brain Abilities and buckle up for a long ride of announcing Clutch over and over and over. This is the ideal endgame scenario, as unfortunate as it is. Most lists for Gholdengo play either one Professor Turo’s Scenario and a Pal Pad or two Turo’s. Most lists also only play three Metal Energy. So, what we’ll try to do is force them to use their resources as much as possible. Once they flash the Riolu, try to Knock Out that Pokémon ASAP. They will usually take the first Knock Out with their first Gholdengo. Then, gust one of their other Gholdengo and use Yveltal’s Clutch to prevent retreating. This gives them one of two options: they can Turo this Gholdengo or just attach another Metal Energy and attack. They will usually choose the latter option. This then leaves them with only 1 Metal Energy left, usually. This allows you to bring up Genesect ex and Clutch it, without the fear of it attacking into you. You can also Clutch a Lunatone or Solrock. Lunatone is the better of the two, because it attacks Yveltal for a maximum of 20 damage, whereas Solrock still hits for the full 70 damage. Clutching Lunatone or Genesect ex will always be one of the better options here, but keep in mind that Lunatone has far less HP, so it gives you less time to stall and spread damage on their field to clean up with.

While you’re stalling with Clutch, you’ll want to make sure you’re setting up two Munkidori with a Darkness Energy each on the Bench. You’ll also want to use Pecharunt ex’s Subjugating Chains Ability to Poison the Yveltal. This way, you are going to naturally generate damage that you can then move onto your opponent’s Benched Pokémon with Adrena-Brain while you’re stalling their Active. You should expect them to Turo twice: however, they shouldn’t be able to take more than four Prizes in this manner if you started optimally and didn’t feed them any two-Prize Pokémon. It is important that you don’t go ahead on Prizes and activate their Counter Catcher. This allows them to Turo and Gust a two-Prize Pokémon on the Bench for free in the same turn. You’ll need to give them as little velocity as possible. Once you’re sure they’re out of Professor Turo, begin moving damage counters onto their board and target one large attacker first before anything else. You’ll naturally accumulate damage on the Genesect or Lunatone that you’re stalling Active, so these can be cleaned up later for additional Prizes. The reason this strategy does not work as well in the Zoroark matchup is that they play multiple Munkidori as well and just throw your damage right back at you and generally have more maneuverability than Gholdengo. If they try to setup a strictly Gholdengo-only board to counteract the Yveltal stalling technique, this is where 4 Penny will come into play, so you can get down to a single Cornerstone Mask Ogerpon ex board state.
Gardevoir ex
The one matchup I can speak to being very favoured for this deck is Gardevoir. Gardevoir’s weakness to Darkness type and Absol stripping important cards out of their hand turn-over-turn, and having a monstrous 280 HP (or 360 HP after all the buffs from Lively Stadium and Bravery Charm) mean that Gardevoir will have a very tough time dealing with Mega Absol ex. Typically, Gardevoir has flexed the upper hand by being able to use Munkidori’s Mind Bend attack to confuse their opponent’s Pokémon that is putting on too much pressure. Since this deck plays Mist Energy, Mind Bend will simply do 60 damage and nothing else. Mist Energy will also be *crucial* to setting up properly. Mist Energy must be established as immediately as possible on Mega Absol ex—this also prevents Mew ex from copying Absol’s Terminal Period attack to Knock Out the Absol. Provided you setup your Absol early and aggressively with this game plan, you should be able to mow down their field easily.

Charizard ex
Versus Charizard decks, I found that Psyduck does not help much due to the previously stated combination of Klefki and Jet Energy. The goal for this matchup is to setup Absol as aggressively as possible and try to Knock Out their lone Pidgey if the opportunity ever presents itself. The important part, however, is to strip their hand using Absol’s second attack. While Pidgeot ex can search out any card it wants, it is usually not the one card they search that makes or breaks their turn. It’s the combination of cards that are already in their hand plus the one they’re searching for that advances their setup. With Absol’s targeted hand disruption being able to pick any specific card out of their hand, you can read which cards will be most effective on their next turn. Sometimes even just stripping Boss’s Orders out of their hand can mean they will need to go through your Active Pokémon in later turns. This is essential to winning this matchup.
There are potential lines with Mega Kangaskhan that are a gamble, but if you can line up 30 damage on a Pidgeot ex, you only need to flip one heads to Knock Out that Pidgeot with Kangaskhan’s Rapid-Fire Combo attack. While these lines are possible, Absol is going to be your bread and butter here. Once they establish a Charizard ex, Absol’s Terminal Period attack should be able to wipe a Charizard off the board easier than it came down. Charizard will almost always have to two-shot any of the Mega Pokémon without using Dusknoir to help, so we can use this fact to steal some of the damage dealt to our Pokémon and throw it back on the Charizard to use Terminal Period and finish it off. Some Charizard decks are beginning to include Mist Energy in their lists to prevent Terminal Period from returning the Knock Out on their Charizard, but this is usually a slow, unreliable tech so it’s not much to worry about. Just keep it in mind as a possibility to look out for! In this matchup, I typically choose to smack into a Charizard ex wherever possible, instead of taking the Knock Out on smaller Pokémon. This accomplishes two things: it pressures the Charizard and means they will probably only get one attack with it; and it also means their Burning Darkness attack will do less damage, allowing you to use Munkidori to maintain damage parity and resist getting return Knocked Out.
Tech Ideas:
A couple tech cards have been floated in the innovation space for this deck. The first one I want to talk about is a tech that was used to win a local league cup here in Hamilton, ON: Hoopa ex PAR 098! This card is specifically very good in the mirror match. If you’re expecting a lot of this deck in your local meta, Hoopa ex can swoop in out of nowhere, use an Energy Switch plus attach for turn to take a big one-hit Knock Out on their Mega Kangaskhan ex.

Another tech card that has been getting more serious traction is the use of Technical Machine: Devolution. This card specifically helps in the Dragapult ex and Charizard ex matchups. It lets you smack into several Stage 2 Pokémon ex without taking the Knock Out on any of them, then Devolution their board back to square one. This tech is genius, in my opinion, and one I will be testing a little more leading up to more major tournaments.
Psyduck is another card I wanted to chat a little more about specifically. Let’s just say the card is good. It answers these cards in a small way and still provides enough disruption that can throw off your opponent’s gameplan if you can get it into play. If you wanted to play it in the above list I provided, I would simply cut the Pokégear 3.0 for it. It’s certainly the weakest card in the list and does not inherently fuel consistency or the general gameplan. I will reiterate it is not right nor wrong to play. It is simply a subjective card choice and just comes down to if you want to play it or not.
The last tech choice we will discuss is Enhanced Hammer. Enhanced Hammer is one of those cards that always seems so clutch in the board states where it would be good in, but then you’ll be dead drawing into Gardevoir and draw that for turn and you’ll want to throw the deck in the garbage. It is theoretically fine to play; you play the full four Arven so you can search for it often enough it can be a worthy tech, and you cycle through the deck quickly enough that it makes sense in a lot of ways. With a lot of decks beginning to include Mist Energy to prevent Terminal Period Knock Outs, Enhanced Hammer is a fine inclusion but make sure you’re aware it can be a brick sometimes.

WRAP UP:
In conclusion, I think this deck was an incredible surprise from the Mega Evolution set. As a funny anecdote, I remember explaining to a lot of my local players that Mega Kangaskhan ex is broken and such a nasty draw engine that’s easy to slot into any deck. A lot of players disagreed, fair enough. But Mega Kangaskhan has proved to be such a powerhouse. Coupled with the extremely underrated Mega Absol, this deck has become a force to be reckoned with. I will say that a lot of this deck’s viability comes from the versatility in its play patterns. Being able to pivot to a more control-focused gameplan as opposed to an unga-bunga-hit-you-with-big-ex-Pokémon gameplan in the middle of the game is powerful and keeps your opponent on their toes like no other. I’m sure this deck will go through even more evolution (Mega?) as time goes on and will only continue to get better as new sets release. Keep this deck in your back pocket as a powerful one to bring out at any time. Thanks everyone for reading; this was one of my most comprehensive articles I’ve ever written and I truly hope you enjoyed the read. If you have any questions, comments, or want to reach out to chat Pokémon, feel free to message me on X @prcngnpkmn or click https://metafy.gg/@austinellis/sessions to book a coaching session with me and use code LETSGETIT for 20% off your first coaching session! Thanks again everyone for reading!